Ok so I did get the mini album finished today :) I made this for my daughter using some of the pictures of her & her boyfriend together. Well here is the finished project.
Supplies used: Xyron adhesive, Nikki Sivils Beatrice line & burlap buttons, Maya Road wooden buttons & flowers, Prima pearls, misc ribbon.
Monday, February 28, 2011
I'm So Grateful For You!!!
Hey there everyone.....I know 2 posts in 1 day!!! Well today is my last day as a design team member at Just Imagine Kreaxions Punches so I wanted to share my creation with you today. I started working on this mini album (which the inside is not done yet), I will share the entire album once it's finished....which maybe later today if the mojo keeps flowing:) So the size on my mini is 8 1/2" X 4 3/4" .
On this cover you will find some YUMMY Nikki Sivils paper and stickers from the Beatrice line. Super excited I can now get all of the lines locally at The Scrapbooking Studio :):):):) I did a little stitching on the green background paper before attaching it to my chipboard. I also love ink, so yep I inked everything! The fabulous little butterfiles are from Kreaxion Punches!!! Are they not super cute?!?!?!? The buttons that I have tied onto the binding are Maya Road wooden buttons, which I misted to 3 different colors. Now check out those cool burlap buttons on the bottom....yep those are Nikki's too!!!!
Well i'm off to get the rest of my mini done now!!
~Stacy~~
Sketchabilities Reveal
Good morning everyone, happy Monday!!! Well it's that time again....another FABULOUS sketch is up for you over at Sketchabilities!!! Come on over check it out and get your scrap on!!!!
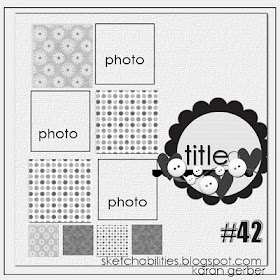
Ok here is the sketch by created by Karan (LOVE IT)
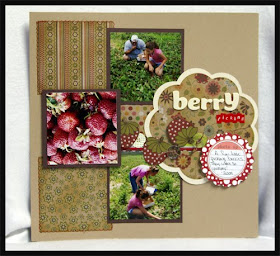
Here is my take on this sketch. I used some fun pictures from when we went picking strawberries.
The scoop on what I used: Xyron adhesive, Bazzill cardstock, Jillibean Soup paper & sprouts, MLS mini alphas, American Craft thickers.
Ok here is the sketch by created by Karan (LOVE IT)
Here is my take on this sketch. I used some fun pictures from when we went picking strawberries.
The scoop on what I used: Xyron adhesive, Bazzill cardstock, Jillibean Soup paper & sprouts, MLS mini alphas, American Craft thickers.
Saturday, February 26, 2011
Super Saturday!!!!!! :)
Hey there everyone, hope you are all having a fabulous start to your weekend! I am :) I have some layouts up on Nikki Sivils blog today!!!!!! Come on over HERE and check them out!!!!
Have a FABULOUS day!!!
~~Stacy~~
Have a FABULOUS day!!!
~~Stacy~~
Friday, February 25, 2011
Lucky Girl Crafts FFD Challenge
So it was my turn at Lucky Girl to come up with the FFD Challenge. I LOVE to create gift bags/boxes!!!! They are so fun and a one of a kind gift in itself. Well I grabbed my monthly kit and got busy. Here is the fun little gift bag I came up with.
You can head on over to the BLOG and check it out. The instructions on how to create this bag out of cardstock is over there also :)
Thanks for stopping by, have a fabulous weekend.
Stacy
Playing with paper, twine & Xyron
Hey there everyone....well TGIF!!! So I came across these super cool wooden bobbins from Maya Road at The Scrapbooking Studio and thought.......I could make a braclet with some of my scrap paper. So gather some of your left over paper (I used Jillibean paper), Xyron 150 and of course some twine!
Step one - Cut your strips of paper to the width of the bobbin and also cut pieces of twine then run through your Xyron machine.
Step two - Simply wrap the paper and twine around the bobbins.
Step three - Grab some beads and stretch magic and simply alternate the paper bobbins with the twine bobbins placing a bead between each bobbin.
So there is my little project for today....so remember NEVER throw away your scrap pieces of paper, you never know what you can make with them.
Wednesday, February 23, 2011
Jillibean & Tim Holtz...2 of my favs!!!
Hey there everyone, I just wanted to share with you a card I made. I love the new line from Jillibean Soup..Dutch Mustard!!! The colors are fabulous and the designs are wonderful as always. I love the new stamps from Tim Holtz also.....I have to say I think that Stuff To Say is my favorite new set that came out. The saying I used on this card......When I want to see love defined I look at you! So that being said here is the card I created.
This is one of the card sketches over at Cardabilities this month. Stop by and join in the challenge.
Supplies used: Bazzill cardstock, Xyron adhesive, Jillibean Soup; Dutch Mustard line & Bean Stalks twine, pop dots, Randger distress ink - brushed corduroy.
This is one of the card sketches over at Cardabilities this month. Stop by and join in the challenge.
Supplies used: Bazzill cardstock, Xyron adhesive, Jillibean Soup; Dutch Mustard line & Bean Stalks twine, pop dots, Randger distress ink - brushed corduroy.
Monday, February 21, 2011
WOOHOO!! Way to go :)
Hey there everyone I just wanted to share another little card I created this weekend. Yesterday my daughter's name was in the paper for making honor roll for second quarter. I thought I had better make here some sort of congrats card. I wanted something fun and funky for her and here is what I came up with. It's also my design team project for today at Kreaxions Punches in which this is my last month designing for them. Don't forget about the DT call they are having!!! You will love the punches and the fabulous Circle Cutter!!
The base of my card is Bazzill kraft cardstock and my Xyron adhesive. As for the pattern paper I used a mixture of My Little Shoebox papers that I had left in my stash; Imaginary Friends, Flyin' High & Lil' Critter. Now you know I had to put some letter stickers on there (my obsession)..so I used MLS mini alphas kiss color. I did a little doodling around that outside of the card with a Stampin' Up marker and also the sentiment is a Stampin' Up stamp.
Well thats all for today, see ya next time!
Stacy
The base of my card is Bazzill kraft cardstock and my Xyron adhesive. As for the pattern paper I used a mixture of My Little Shoebox papers that I had left in my stash; Imaginary Friends, Flyin' High & Lil' Critter. Now you know I had to put some letter stickers on there (my obsession)..so I used MLS mini alphas kiss color. I did a little doodling around that outside of the card with a Stampin' Up marker and also the sentiment is a Stampin' Up stamp.
Well thats all for today, see ya next time!
Stacy
CELEBRATE
Hey there everyone, I hope you all had a fabulous weekend. I did lots of scrapping yesterday so i'm going to share one of the cards I made. I have TONS of birthdays coming up next month so I thought I had better get a jump on some cards.
I LOVE this line from Nikki Sivils....It's Your Day!!! It is simply way to cute and so easy to create with, check out the cute design on this line.....
Supplies used: Bazzill cardstock, Xyron adhesive, Nikki Sivils: It's Your Day, Tim Holtz Rosette, Maya Road twine.
Thanks for stopping by, see ya next time!!
Stacy
Monday, February 14, 2011
Sketchabilities Reveal #41
Good morning everyone and Happy Valentine's Day! I hope you all get some good treats today from your sweetheart. So today is reveal day at Sketchabilities. I love this sketch from Karan...it's so much fun. Here is her sketch.
Here is my take on the sketch, I turned the sketch on my layout.
and a close up of the cluster
I love this picture of Tim and Ariel. Tim is rocking the nerd glasses. Every year the dads did a dance that they worked on for 6 weeks before the recital, this year they had to dress up as nerds!!
Supplies used: Cosmo Cricket Social Club line, chipboard & tiny type letters; Bazzill cardstock; Xyron adhesive, Tim Holtz tissue tape, Maya Road chipboard buttons & dollie; Kreaxions Circle Cutter & butterfly punch.
Sunday, February 13, 2011
Slugger
Well today i've been working on a sketch for a contest. I am loving Little Yellow Bicycle Twig line!!! There is a sketch up now from the fabulous Liz Qualman so I thought I would give it a shot. Here is what I came up with.
and another view for you
Supplies used on this layout: Xyron adhesive & design runner, Bazzill cardstock, Little Yellow Bicycle Twig line, American Craft thickers, Kaiser Craft pearls, Pink Paislee cork, Kreaxions Circle Cutter.
and another view for you
Supplies used on this layout: Xyron adhesive & design runner, Bazzill cardstock, Little Yellow Bicycle Twig line, American Craft thickers, Kaiser Craft pearls, Pink Paislee cork, Kreaxions Circle Cutter.
Thursday, February 10, 2011
To much fun!!
Hey there everyone, I have been busy making some store samples for Amy @ The Scrapbooking Studio for some of the new products that are on their way. So i'm super excited that she is going to carry Nikki Sivils. Here is a layout I created using the yummy Summer collection!! I had so much fun with this one, I think it's one of my favorites.
Here is one of the other new collections It's Your Day! I love this picture of Luis with cake and ice cream all over his face!
Other supplies used on these layouts: Xyron Adhesive, Bazzill cardstock, American Crafts thickers, Cosmo Cricket tiny type letters, Maya Road twine.
Well i'm off to work on some more samples, thanks for stopping by :)
~~Stacy~~
Wednesday, February 9, 2011
Lucky Girl Blog Winner
Hey there everyone, just a qucik post today. The winner for the Lucky Girl blog party is Crystal aka Caitynssmommy!!! CONGRATS :)
please direct them to e-mail Jessica at jasafras98@yahoo.com to claim their prize no later than February 14th.***
Have a great week!
please direct them to e-mail Jessica at jasafras98@yahoo.com to claim their prize no later than February 14th.***
Have a great week!
Monday, February 7, 2011
Summer Fun with Little Yellow Bicycle's Twig!
Well it's the middle of winter here in the midwest and i'm telling you i'm counting the days until spring/summer!!! So since I wanted to think warm thoughts, I created this layout using the fabulous new line from Little Yellow Bicycle....Twig.
I love this line. The color and design are simply fabulous! I created this for The Scrapbooking Studio, where you will soon be able to grab this line at!
Supplies used: Xyron adhesive, Bazzill cardstock, Pink Paislee letters (cream), Cosmo Cricket letters (brown), Maya Road twine, and some misc buttons.
Friday, February 4, 2011
Forever Sisters
Hello everyone!! Well today i'm going to share with you one of my DT projects for AWDML. It is a tip/technique on changing the color of a flower using some ink & mist. Here is the layout I used the flower on.
and a close up of the flower
So what you want to gather is a flower, Tattered Angels mist, and Ranger Adirondack Alcohol Ink.
Step 1- Simply place a couple of drop of the Alcohol Ink into the center of your flower making sure to cover the entire center of the flower.
Step 2- Ok this is the last step, yes…it’s really this easy. Take you mist and mist the entire flower. You can heat set this if your in a hurry for it to dry and simply let it air dry.
Other supplies used on this layout: Cosmo Cricket Circa 1934 & Tiny type, Xyron adhesive, Bazzill cardstock, American Crafts foam pop dots.
So ladies….lets see those altered flowers on your pages. See you next time
Thursday, February 3, 2011
My One Little Word
So I have had my OLW picked out since the beginning of the year, however since I had first seen Echo Park's For The Record in the works I knew that I wanted to wait until that line came out. I altered this clipboard to showcase my OLW. There is alot that I want to Achieve this year on my list and I have already achieved one thing on my list :)
I found this clipboard in the dollar section at Target!! WOOHOO!! So I started with the background paper and some fabulous Xyron adhesive to get started. I tied a bunch of ribbon around the clip. Once I had all of my paper down it was time to decorate. I used some of the stickers from For The Record, Kreaxions Circle Cutter for the black cicle on the left side,Prima butterflies & pearls, Pink Paislee letters, Tim Holtz buttons & gears from the die cut. Once everything was down I also used Tim Holtz tissue tape around the outside.
Day 3 of Lucky Girl blog party
Hello everyone. Today is the last day of this months blog party for Lucky Girl. For my last project I created a cute little gift card holder to give someone for their birthday.
On this project I used a template to cut the pillow out then simply folded and decorated it. Like I said you can put a gift card, cash, or anything fun that will fit into this.
Supplies used: Lucky Girl Feb kit, Xyron adhesive, yellow tulle (I had this it does not come in the kit) and of course I had to do some inking!
Well thanks for stopping by, have a fabulous day!
Wednesday, February 2, 2011
Snowday = Scrapday!!!!
Hey there everyone, well since we are totally snowed in what better way to spend my day then scrapbooking thinking about summer!! I'm super excited to get to play with one of Nikki Sivils new lines: It's Raining It's Pouring. This line was perfect for our water fight that we had last summer during a cookout. Not sure if you can tell in the family picture but we are all totally soaked!! The fabulous news it that you are going to be able to get this locally now!! WOOHOO!! Thanks to The Scrapbooking Studio!
I think you will love this line. So many fun little things to cut out and pop up, and the sticker sheet simply just rocks!! I used Bazzill cardstock, Xyron adhesive & a Stampin' Up marker for the journaling.
Lucky Girl Blog Party day 2
Hey there everyone, it's day two over at Lucky Girls blog party. This is my first month as a DT there and I simply loved this kit! Here is my second project with this kit.
Make sure you stop by and check out all of the FABULOUS Lucky Girl DT's blogs! See the post below for links to their blogs.
Hope you all have a fabulous day...it's a snow day for us here today, so I think i'm going to do some scrapping :)
Make sure you stop by and check out all of the FABULOUS Lucky Girl DT's blogs! See the post below for links to their blogs.
Hope you all have a fabulous day...it's a snow day for us here today, so I think i'm going to do some scrapping :)
Tuesday, February 1, 2011
My first Lucky Girl DT Reveal
It's reveal day over at Lucky Girl!! Here is my first project working with this FABULOUS kit!!
Join us each day of the blog party (February 1, 2 & 3) to take a peek at the projects the Lucky Girl DT has created with this month's kit. We'll also be giving away prizes to a few LUCKY GIRLS - are you one of them? Read on to find out how you can win! Here is this months fabulous kit!!
Want a Lucky Girl kit of your own? Check out February's fantastic special:
Get 15% off any prepaid Lucky Girl Crafts subscription - available in 3, 6 and 12 month options when you use code LOVE2SCRAP at check out.
For international orders, please contact Jessica by e-mailing your order to Here's how you can win $7 lucky bucks to the store: jasafras98@yahoo.com
Earn 1 entry for referring a friend to the LGC blog party
Earn 1 entry for answering my question (What fun games did you play with other neighborhood kids?)
Earn 10 entries for the giveaways on all of the Lucky Girl Crafts Blog Party when you place any order between now and January 3!
Be sure to visit all of the Lucky Girls to check out all of the amazing projects created with the Kid at Heart kit and to have an ever greater chance of winning. Each of us has lucky bucks to give away - are you feeling Lucky?
(DT, please be sure to link each member's name to her blog)
Ana
Jessica
LGC Store Blog
Ruth
Sabrina
Emily