Thursday, October 31, 2013

Tricks Or Treats???

Happy Halloween everyone....do you think there are tricks or treats inside of my box??  I have a fun little Trick or Treat box to share with you today.  I had a box in my stash that I think a pair of earrings came in, and I thought it was the perfect size to put a few little candy bars in or even spider rings or something cute!

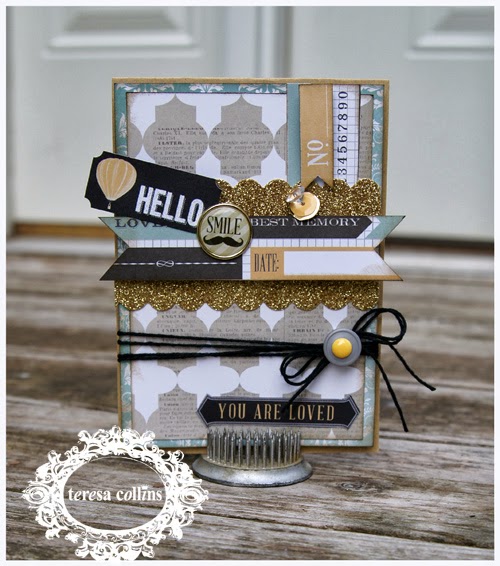
This is how the box turned out.


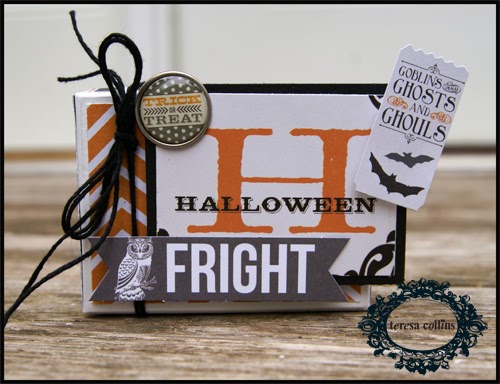
I used the Masquerade Party collection for this one.  On the lid of the box and the box itself I used the "Webs" paper the orange chevron side.  I simply cut the paper slightly smaller then the box and adhered it with Xyron Mega Runner.  For the sides of the lid I used the stripes from the "Trick Or Treat" paper.  To embellish the lid the "H" with Halloween across it is actually from the small treat bag.  I cut it down and matted it on black cardstock.  I popped this up on the upper right corner of the box.  The fun little ticket was cut from one of the borders.  I embellished it with a brad and one of the die cuts from the sheet.  Once I was done with the I tied a little solid black twine around it from The Twinery. You can grab all of the supplies needed to create this from The Scrapbooking Studio online store!


Supplies Used:
Teresa Collins - Masquerade Party
The Twinery - Solid Charcoal Twine

Thanks so much for stopping by today, hope you all have a fun and safe Halloween! 
 
~Stacy

Monday, October 28, 2013

Joy } Xyron & Maya Road Team Up

Good morning everyone, this week Xyron and Maya Road have been teaming up for a fun week of inspiration!!

So for some reason I have been in the Holiday spirit lately....I know it's early and I think it's because it snowed here a little last week.  I always wait until the last minute to start my Christmas cards, and then yes they never get done on time to send out so I stop making them!  I thought maybe if I started early this year I might get them out on time.  Now I have one down and tons more to go :)  Here is the card that I created for this swap.

I used Bazzill Nordic Pine collection for the paper line.  I placed the paper on the background and then using a different sheet cut out the shape using a Sizzix die Cameo Frame.  I popped that up using the foam squares from the Xyron Teresa Collins Adhesive kit.  Before I placed that shape down on the card I used the Maya Road Red Twine and tied it around the shape.  I took some Maya Road tulle ribbon and made a little flower then placed the Maya Road Vintage Trinket in the center.  The chipboard letters I painted with Art Anthology Truflle Velvet Dimensional Paint and then adhered them to the card using my Xyron High Tack Tape.  Once the letters were on the card I put little dabs of Art Anthology Cotton Velvet Dimensional paint to give it a snow effect.

Supplies Used:
Xyron - Mega Runner, TC Adhesive foam squares & High Tack Tape
Maya Road - Vintage Trinkets, Ribbon, Red Twine & Chipboard Letters
Bazzill - Nordic Pine collection
Art Anthology - Paints (Cotton & Truffle)
Sizzix - Cameo Frame
 
Thanks so much to Maya Road for sharing some fabulous products with us.  Hop on over and check out all of the amazing projects this week on Xyron's blog and Maya Road blog!
 
~Stacy
 

Art Anthology Christmas Taggin' It

Hey there everyone....yes i'm psting a Christmas project today.  You see it snowed here in the midwest the other day and I actually bought my first Christmas gift so I was kind of in the holiday mood!  I even had the crazy thought of wanting to put my tree up (I didn't because hubby would have had me commited)!!

I created this tag and a fun tutorial of how to create this tag on my youtube channel and also on the new Art Anthology youtube channel.  If you have a moment please hop on over and follow the new Art Anthology channel HERE!!

Ok so let's check out the tag, it's the perfect way to add a little something special to any Holiday gift that you give this year!

I will list out the supplies I used so that you can gather them and get busy on your one of a kind gift tags for the season!

Supplies Used-
Blizzard Dimensional Crystal
Colorations Spray - Pesto & Cinnamon Toast
Velvet Dimensional Paint - Truffle & Cotton
Ranger - #8 Manilia Tag
Stampers Anonymous - Classics #10 Stamp Set
May Arts - Misc Ribbon
Seam Binding

You can grab all of the goodies to create this tag at The Scrapbooking Studio Online store HERE!

Here is the link for you to check out the video!


Thanks for stopping by today, have a fabulous day!

~Stacy


Thursday, October 17, 2013

Stencil Fun with Xyron & StencilGril Products

Hey there everyone, this week Xyron has teamed up with StencilGirl Products for a fun week of inspiration.  Make sure you check out all of the amazing projects that have been created this week, you can stop by Xyron's Blog or StencilGirl Blog!


I created a tag for this one.  I love the funky background created with the StencilGirl stencil Crazed Stencil.  I placed it over a Ranger Manila tag #8 and blended with Fired Brick Distress Ink.

Once I was done blending with the Fired Brick ink, I outlined it with a black sharpie marker.  I used a little bit of Bazzill Nordic Pines paper to turn it into a Christmas tag.  I embellished the tag with American Craft Thickers, some burlap, and a few Tim Holtz Idea-ology goodies.

Supplies Used-
Xyron Foam Squares
Ranger Distress Ink Fired Brick, #8 Manila Tag
Tim Holtz Idea-ology - Memo Pin & Chitchat Sticker & Adage Ticket
Bazzill Pattern Paper - Nordic Pines
American Craft - Thickers
Misc- Burlap Ribbon
 
Thanks so much for stopping by today, have a wonderful day!
~Stacy

Thursday, October 10, 2013

Spooktacular Mini } TCD Masquerade Party

Hello everyone,  I'm going to share a fun mini album I created with the spooktacular new Masquerade Party collection from Teresa Collins Designs.  This collection is so fun I just love everything about this line. I created this album for my sister in law using their Halloween photos from last year.

Here is a view of the album itself.  I created this album using the three larger file folders, 2 of the bags, and the packaging from the bags as well.  The binding it done with the We R Memory Keepers Cinch machine and coils.  The ribbon tied on the side is May Arts ribbon that I had in my stash.

This front cover I used the small file folder and embellished it with one of the white bags, a few enamel dots, die cuts and chipboard sticker.


The inside of the cover I placed a spot for journaling.  You can see the first page inside is one of the bags.  It's such a perfect page for any mini album.  I had a few photos left over and you can see that I simply matted the photo and stuck it right in the bag!


The medium file folder is the next page.  On all of the file folders I placed adhesive along the top and bottom to create more pockets throughout the album.  There is a journaling spot behind the photo that slides out.  This is a fun way to add plenty of journaling spots in your albums.  All you do is place adhesive along the sides and bottom of the photo and it holds your journaling cards.


A Halloween party is not complete without treats!  You can even add the recipe on the journaling card, or place it inside the file folder pocket.  I loved the design on the packaging on the right side below, so I turned that into a page as well and covered the flip side with pattern paper.


The last page of the album is the largest file folder that comes in the pack.  This one is so fun and I really didn't want to cover much up so I added the photo then placed the amazing chipboard frame around it.


The entire album is embellished with all of the fabulous goodies that go with the line.  I added a few enamel dots here and there.  Mix the die cut tabs throughout your mini albums and add a staple here and there and you have one amazing mini!

Supplies Used:
Teresa Collins - Masquerade Party Collection
Xyron Adhesive - Mega Runner
We R Memory Keepers - Cinch
May Arts - Misc Ribbon

Thanks so much for stopping by today!

~Stacy

Wednesday, October 9, 2013

EEK } Getting Inky with Art Anthology, Basically Bare & Authentique

Good morning everyone, I just wanted to share with you my first creation on the fabulous Art Anthology blog.  This week the DT is rockin' a fabulous swap with Authentique and Basically Bare.  I created a mini album for this one using a Basically Bare Bare Booklet, Authentique Thrilling Collection and tons of Art Anthology goodies.....can I just tell you I totally love it!!  I can't wait to carve pumpkins so I can add my photos to it.
SONY DSC
You can see at the top of the cover I used a chicken wire stencil and used the Juicy Colorations Spray.  Before I placed the spider and EEK on the cover I then lightly sprayed a little Radier over the top. 
SONY DSC
The spider and the letters "EEK" I cut out of grungepaper using a couple of Sizzix dies. I painted the spider with Tuxedo Dimensional Paint and EEK with Kenyan Dimensional Paint.  I popped those up on the cover with foam pop dots.
SONY DSC
Now for a little peak at the inside of the album. I did a little fussy cutting on the owl, cat & hat on the lower right page of the album.  The moon behind them was so cool but I added some Sunbeam Dimensional Crystal to it.  I simply set that aside to dry while I finished the rest of my book, then popped that up on the page once it was dry.
SONY DSC
I love adding journaling spots in my albums from the paper collections as pages.
SONY DSC
SONY DSC
The next page of the album I sprayed both sides of the acrylic piece using Timeless Coloration Spray.  I actually sprayed one side at a time and I did heat set it before flipping it over to do the other side.
SONY DSC
Here is a close up and hopefully you can see it better, it just gives the acrylic a fun look.
SONY DSC
Up next is the last page of the album, a place for another photo and an element cut out using the Forewarn sheet from the Authentique Thrilling collection.
SONY DSC
Thanks so much for stopping by today, I hope you enjoyed my very first project using Art Anthology, hop on over to the AA blog and see all the amazing creations from the team!
Supplies Used:
                  
~Stacy

Monday, October 7, 2013

Halloween Parade } Xyron & Doodlebug Team Up

Happy Monday everyone. I have a couple of fun little cards perfect for any of your spooks for Halloween!  This week Xyron and Doodlebug Design have teamed up to bring you some super cute and fun projects!  

I created with the fun and colorful Doodlebug Halloween Parade collection.  I have to say I love the fun flair and 3D stickers in this collection.

Here are the fun little cards I created!  The stickers with this collection are so much fun and pretty much make up the entire top card.


How about those yummy bling on the upper right of this card.  The pumpkin on the left side of the card below is a 3D sticker, and I thought it went perfect with the pumpkins on the sticker.


A big thanks to Doodlebug for sharing some of your fabulous products with us!

Supplies Used:
Xyron - Mega Runner
Doodlebug Design - Halloween Parade

Have a fabulous day!
~Stacy

Wednesday, October 2, 2013

Hello everyone today i'm going to share a card with you that I created for my little sister.  It's been a tough week here as she and her husband have moved to Texas!  I'm sad to see her go, but so very proud of her.  I now have a new place to vacation to :)

Here is the card that will be making its way to Texas.

On this card I used the new Memorabilia collection.  I simply love this line, and the colors are amazing!  I started with the base of the card being 4 1/4" x 6".  I cut the blue pattern paper (the back side of the "frames" paper) to 4" x 5 3/4".  Pop that up on the card base, then adhere the the Quartrefott paper cut to 3 3/4" x 5 1/2" center on the lbue paper.

You can embellish the card with the border strips ( i used the blingy gold scallop one) across the upper part of the card.  I cut a strip of paper and made a little banner piece to go over the gold border.  Then it was time to embellish.  You can see that I used the rockin' smile brad....have you seen these???  I mean really they are gold not silver...AMAZING!!  I also cut a few little banner pieces from the "Labels" sheet and placed those in the upper right corner.  Tied a little bow using Twinery Twine and embellished that with one of the buttons and enamel dots.  Here are a couple of close up pics for you.

I LOVE LOVE LOVE the corsage pins with this line.  I just added a few of the sequins onto the pin before sticking it in the foam pop dot behind the banner.


Supplies Used:
TC - Memorabilia collection
Xyron  - TC Adhesive Kit
The Twinery Twine - Solid Charcoal
Ranger - Distress Ink (walnut stain)

Thanks so much for stopping by the blog today, have a fabulous day!

Tuesday, October 1, 2013

Thinking Of You

Hey there everyone, thanks for stopping by today.  This week Xyron is teaming up with Core'dinations to bring you tons of inspiration!  I have a tutorial of how I created this tag so that you can give it a try.  Here is the finished tag for you to see first.


So to start with I used Core'dinations Tim Holtz Kraft-Core Shattered collection and cut a piece out.  I then used the Sizzix Tag & Bookplates die to cut the tag out.


Next emboss the tag using the Sizzix Wood Planks Set.

The next step is to take the Core'dinations sand-it block and sand off the embossed design.

Run you embossed tag through the Xyron 3" Sticker Marker and adhere it to a Ranger size #8 Manila tag to make it a little more sturdy.

Take any Ranger distress ink (I used Walnut Stain) and ink the edges and also ink the embossed sanded parts of the tag.

Using the Core'dinations Chocolate Box papers stamp "thinking of you" image from the Stampers Anonymous set using Ranger Jet Black Archival ink on the paper.

Cut out the sentiment and use the sand it block to rough up the edges and a little across the sentiment.

Now it's time for the fun part.  Decorate your tag using any embellishments you want.  I used a mixture of seam binding, misc moss, Petaloo flowers & leaves.  I adhered all of this using the Xyron/TC Adhesive Kit liquid glue.  I also popped up the sentiment using the foam squares from the kit.
Here is a close up photo for you.  You can add memo pins or stick pins when you have placed all of your embellishments down for an added little touch.


Supplies Used:
Ranger - Wild Honey distress ink, Jet Black Archival ink, #8 manila tag
Stampers Anonymous- Simple Sayings
Canvas Core- canvas
Petaloo - Paprika flowers & leaves medium
Sizzix - Wood plank embossing set, Tags & Bookplates die
Misc - seambinding & moss

Thanks for stopping by today, hope you have a fabulous day.  Check The Scrapbooking Studio online store for the products used on this project.

~Stacy