Tuesday, April 29, 2014

Family Canvas

Hello everyone thanks for stopping by! Today i'm sharing a fun little canvas that I created with a little bit of recycling added in.  I love all of the new subway art things I have been seeing around.  I wanted a way to be able to make my own letters to stencil onto a canvas....so i'm going to show you how I did that today step by step.  Here is what the finished canvas will look like when you are done.
AA_Canvas step 10
I love my Sizzix dies and the packaging from them will make perfect stencils!!!  I grabbed my word play die and cut a few small pieces from one of the packages I had, ran it through my Vagabond and now I have my own letter stencils ready to use!
AA_Canvas step 1
Next I ran them through my Xyron 150 sticker maker using the repositionable cartridge, then laid them on the canvas.
AA_Canvas step 2
AA_Canvas step 3
I started the layers of color first using Art Anthology Metal Effects Gold Dimensional Medium.  I took a paint brush and added this color across the letters.  The next color I blended in was Art Anthology Metal Effects Bronze Dimensional Medium in the upper left and lower right corners.
AA_Canvas step 4
Now I wanted to add that pop of color.  I have to say I think this next color is one of my favorites!!  I added a little Art Anthology Terracotta Velvet Dimensional Paint across the letters as well.
AA_Canvas step 5
Now for the fun flower in the corner.  I created this using coffee filters.  You will need 2 coffee filters.
AA_Canvas step 6
Layer the 3 filters on top of each other and then fold into a triangle.
AA_Canvas step 7
Cut the top of them in a scallop shape.
AA_Canvas step 8
Spray them with the Art Anthology Colorations Spray, I used Sandcastle and then dry them with a heat tool.
AA_Canvas step 9
Once I was done with this, I took some Art Anthology Dimensional Crystal (Red Corvette) placed some on my craft mat, then dabbed the flower all over it and heat set it.  You can place a brad through the 3 filters and then "crunch & fluff" until you get the flower to look how you want it.  Once that was done it's time to place that flowers and some Petaloo flowers I had in my stash onto the canvas.  Before doing this I used Art Anthology Sorbert Dimensional Paint Black Leather Jacket and splattered it onto my canvas.  After placing my moss and flowers where I wanted them using my Xyron Liquid glue, I took a lid from the Colorations Sprays and made black circles all over the canvas as well.  Here is my finished project.
AA_Canvas step 10
AA_Canvas step 11
Supplies Used:
Art Anthology - Dimensional Crystal Red Corvette
Art Anthology - Colorations Spray Sandcastle
Art Anthology - Sorbet Dimensional Paint - Black Leather Jacket
Art Anthology - Velvet Dimensional Paint - Terracotta
Art Anthology - Metal Effects Dimensional Paint - Gold & Bronze
Xyron - 150 Sticker Maker & Repostionable Cartridge & Liquid Glue
Petaloo International - Flowers (Darjeeling Petites &Darjeeling Hydranges)
Sizzix - Word Play Die

You can find these products online at The Scrapbooking Studio HERE!!

Thanks so much for stopping by today, have a wonderful day!

dt image

Wednesday, April 23, 2014

Xyron & Teresa Collins Team Up

Hey everyone, thanks for stopping by today.  We have an amazing week of inspiration for you from the Xyron DT as we are doing a swap with Teresa Collins!
 
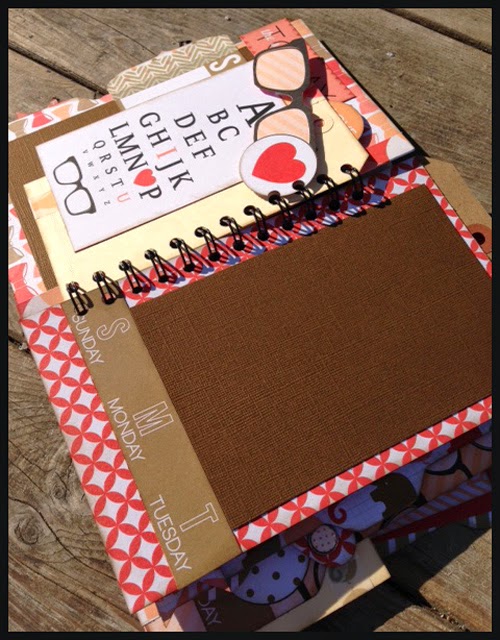
I'm loving the You Are My Happy collection and the new Daily Stories collection from Teresa Collins.  We were lucky enough to get our hands on both along with some of Teresa's new stencils and flip book!!  AMAZING goodies!!
 
For my first project I have started working on the Flip book.  I don't have the photos printed yet for the inside, but love how the cover turned out.  I used the 6x6 paper pad of Daily Stories, there are so many fun elements that you can cut apart to use for embellishments.  I have inked the edges using Walnut Stain Distress Ink.  I ran the small elements through my Xyron 150 sticker maker, used the foam squares from the Teresa Collins Adhesive kit to pop up some of the images, and the Mega Runner took care of the rest.


Up next is a mini album that I created using the You Are My Happy Collection.  The binding on this mini album was done using the We R Memory Keepers Cinch machine.  I loved adding the tags into the album, and the washi tape for this line is super cute!  I used the Xyron Mega Runner & glue dots for this project along with the foam squares from the Teresa Collins Adhesive kit to pop up embellishments.


Supplies Used:
Ranger - Walnut Stain Distress Ink
We R Memory Keepers - Cinch Machine
 
Make sure you hop on over to the Xyron DT blog to see all of the amazing projects all week, and also stop by the Teresa Collins blog to check out what her team has for inspiration.
 
Have a wonderful day!
~Stacy


Tuesday, April 15, 2014

It's A Celebration }Clear Scraps Creating Made Easy

Hey everyone today i'm sharing my second project that I created with this months amazing kit from Clear Scraps Creating Made Easy Kit Club!!  I LOVE mini albums and the 4x4 Chipboard Regular Album in this kit...well I had so much fun with it!!  My grandsons birthday is in the Summer and now I have an album waiting to be filled with those fun photos!!
For this album I used the fun paper line from Carta Bella It's A Celebration.  I'm an inker....I mean I ink everything in my albums. 
April chipboard album cover
Now how about some photos of the inside of the album!!
April chipboard album kit 1-2
April chipboard album kit 3-4
April chipboard album kit 5-6
April chipboard album kit 7-8
April chipboard album 9-10
I created small pockets on some of the pages to insert my photo mats in.  I love to use the images or journaling pieces from paper collections as page inserts inside of my mini albums also.  I used some May Arts ribbon to bind my album simply by punching the holes back in the album after I adhered my pattern paper to it.

Supplies Used:
Ranger Walnut Stain Distress Ink
Xyron - Mega Runner
Carta Bella - It's A Celebration
May Arts - Ribbon
Thanks for stopping by today, see you next month with another amazing kit!!
~Stacy

Monday, April 14, 2014

Art Anthology Tag Fun

Hey there everyone happy Monday!!!  I'm going to share a tag that I created using some of my fabulous Art Anthology goodies!   I love art journaling and I'm going to add this tag to my journal.  I think I'm going to use some washi tape and just add it in as a small little flip page somewhere inside.
Here is a peak of the top of the tag.  The beautiful blue ribbon is seam binding that I colored with the Colorations Spray (Waimea Bay).  While I was heat setting the binding I scrunched it in my hand to give it some wrinkle!  As you can see I played with a little stencils and some lids of the coloration sprays.
Tag2
Ok so here is the finished tag.
Tag copy
To start this tag I used a #8 Manila tag and painted it with the Art Anthology Gesso, then gave it a little heat set.  Next I took a paint brush and small amounts of the Velvet Dimensional Paints (Pink & Aloha) and painted spots here and there.  I used a Dina Wakley stencil (Plastic Canvas) with my Mayan Gold Velvet paint.  I heat set that for a second then stamped the saying on the mid left of the tag.  The green color on the tag is Sorbet Dimensional Gel Paint (June Bud).  I applied this on the outsides of the tag with a paintbrush.  I still felt that it needed a little pop of color so I used the Fiesta Velvet Dimensional paint for the circles.  I created these circles by grabbing one of the lids from the Coloration Sprays and just dabbing them into the paint then onto the tag.  Once I was done I tied the seam binding at the top!!  This is going to make a great addition to my art journal.

Here is a list of the colors I used, you can grab all of these online at The Scrapbooking Studio!

Supplies Used:
Art Anthology - Velvet Paint(Fiesta, Mayan Gold, Pink, Aloha)
Art Anthology - Sorbet Dimensional Gel Paint (June Bud)
Art Anthology - Colorations Spray - Waimea Bay
Stencil - Dina Wakley -  Plastic Canvas

Thanks so much for stopping by the blog today, hope you have a great day!!
~Stacy

Thursday, April 10, 2014

Basically Bare Travel Album

Hello everyone, thanks for stopping by today.  I'm excited to share my first project with you as part of the Basically Bare design team!  My family and I are planning a trip this Summer so I thought this would be the perfect Travel mini album to create so after our trip I can simply just add photos and journaling to it.
For this album I used the Basically Bare Timeless Tab album.  To start with I removed all of the pages from the metal coils, designed and covered the pages, then used my cinch machine to punch the holes through the pattern paper that  I covered the album with.  So let's start with the cover shall we.
I placed the pages on the pattern paper, traced around it then cut it out.  Once the pages were adhered to the album there were a few spots that needed a little file action to smooth the paper, then I inked all the edges.
SONY DSC
I love to tie ribbon, trims and whatever other "junk" I can find onto the binding of my mini albums.
SONY DSC
Now for a peak inside. As you can see I have photo mats ready to go along with journaling cards.  I love how lots of the pattern papers have that one sheet that you can cut apart with fun images to add to you projects.  In the photo below you can see on the right side that I used that as a fun little insert into the album.  The back side of this is the perfect spot to add another photo to.
SONY DSC
This album has fun envelope pieces inside which will be a fun way to insert keepsakes from the trip.  Of course I had to add pattern papers and embellies to them!
SONY DSC
This next page I think is maybe my favorite of the album.  On the left side I made a little flip up piece to hide the photos.  That piece only has adhesive on the sides and bottom to make a top pocket to slide in the journaling card.  On the right side you might not be able to see it very well but there is a half piece of acrylic.  I used Art Anthology gesso and stencils to place to word "Remember" on it.
SONY DSC
Supplies Used:
Basically Bare - Timeless Tabs Album
Echo Park Paper - Getaway
Xyron - Mega Runner
Thanks so much for stopping by today and thank you to Basically Bare for having me as part of your family!  I hope this album inspires you to create a fun travel album for your next trip!
~Stacy

Wednesday, April 9, 2014

Petaloo & Xyron make Eggs-tra Special Easter Projects

Hello everyone and thanks for stopping by today.  I'm so excited to share my first post with you as part of the Petaloo Design Team.  I've been working on a couple of Easter projects.  For this first project I found a paper mache egg and turned it into a beautfiul home decor piece.  To start this project I simply tied some May Arts ribbon in a know around the egg itself, then started to glue the flowers on with my liquid glue from Xyron.  Once I was finished I tied the ribbon in a bow at the top ofthe egg.  You can set this project out or hang it from the ribbon.
Easter_Petaloo1
Supplies Used:
Petaloo - Velvet Hydrangeas (Violet & Sage)
May Arts - Green ribbon
Paper Mache Egg 4"

I love to make tags so that is my next project to share with you. The Graphic 45 Sweet Sentiments collection was the perfect collection for this Easter tag.
Easter_Petaloo2
Easter_Petaloo3
Easter_Petaloo4
Supplies Used:
Petallo - Botanica Collection Floral Ephemera (Lav/Purple)
Graphic 45 - Sweet Sentiments
May Arts - Green ribbon
Ranger - #8 Manila Tag

Thanks so much for stopping by the blog today, I hope you give one or both of these Easter projects a try!  Have a wonderful day.
~Stacy

Thursday, April 3, 2014

Acrylic Wall Hanging } Clear Scraps Creating Made Easy

Hello everyone, today i'm sharing my first project as a design team member for the Clear Scraps Creating Made Easy Kit Club.  This months kit is so much fun to create with...albums, stencils, inks, sprays.....way to much fun!!
For my first post i'm going to share with you what I created with the acrylic album that came in this kit.  I created a fun wall hanging.  I know there are tabs on a couple of the pieces, but I simply used Xyron High Tack Tape to adhere them together (slightly overlapped) and it worked perfectly!  Here is the finished project below.
April kit Acrylic wall hanging1
Let me first tell you what I did to each piece.  The top and bottom pieces I painted with Cotton paint.  The second piece I used the super cool Polka dot stencil from the kit with Mayan Gold paint.  That middle piece was colored using Terra Cotta Alcohol Ink, and that fourth piece I used the fun Chevron stencil with Lagoon paint.  Once I was done painting and inking all of the pieces I set them aside and let them dry.  Now lets get to the close up photos!!

This photo below is the top of the wall hanging.  I added some bits and pieces of Graphic 45 Couture collection to make the banner across the top of the top.  I used some letter stickers down the side of the hanging to spell out "Style" and embellished it with some amazing Petaloo flowers that matched the collection and paints that I used.  I had some black ribbon in my stash that I used to make the tie at the top.
April kit Acrylic wall hanging2

I added a little image with a saying toward the bottom of the hanging and adhered that with foam pop dots to give it a little dimension, then placed more flowers around the bottom.
April Kit Acrylic wall hanging3

Supplies Used:
Xyron - High Tack Tape & TC Adhesive Kit foam squares
Art Anthology - Velvet Paint (Mayan Gold, Lagoon)
Petaloo - Botanica Blooms (Teal)
Ranger - Alcohol Ink (Terra Cotta)
 Graphic 45 - Couture Collection

I hope you enjoyed my first project as part of  the Clear Scraps Kit Club Design Team today!! 
Have a creative day!
~Stacy